-
Zabbix 설치 매뉴얼Infra/NMS - Zabbix + Grafana 2025. 4. 13. 13:43
먼저 Zabbix를 설치해보려 한다.
참고 URL :
Download and install Zabbix
Talk to experts Benefit from expert advice and best practices for all Zabbix-related matters Get technical advice Get instant access to a team of Zabbix experts for guaranteed professional support 24x7 Obtain knowledge Focused, comprehensive training for a
www.zabbix.com
📌 목차설치 환경 및 목표 버전
< 설치 환경 >
- 서버 : ubuntu-24.04.2-desktop-amd64
- CPU / Memory /HDD : 2 vCPUs / 8GB / 100GB
< 설치 목표 >
- Zabbix 설치 버전 : 7.2
- 데이터베이스 : MySQL
- 웹 서버 : Apache
설치 방법
1. 새로운 root 세션으로 Zabbix repository, Server, Frontend, Agent 설치
sudo -s


wget https://repo.zabbix.com/zabbix/7.2/release/ubuntu/pool/main/z/zabbix-release/zabbix-release_latest_7.2+ubuntu24.04_all.deb
dpkg -i zabbix-release_latest_7.2+ubuntu24.04_all.deb
apt update

apt install zabbix-server-mysql zabbix-frontend-php zabbix-apache-conf zabbix-sql-scripts zabbix-agent
2. 초기 데이터베이스 설정
mysql -uroot -p
Enter password: 아무거나 입력
ERROR 2002 (HY000): Can't connect to local MySQL server through socket '/var/run/mysqld/mysqld.sock' (2)

apt install mysql-server -y // 위 에러 출력 시

mysql -uroot -p
Enter password: 아무거나 입력

mysql> create database zabbix character set utf8mb4 collate utf8mb4_bin;
mysql> create user zabbix@localhost identified by '패스워드 입력';
mysql> grant all privileges on zabbix.* to zabbix@localhost;
mysql> set global log_bin_trust_function_creators = 1;
mysql> quit;
2-1. ERROR 2002 출력 시 mysqld 상태 확인 후 설치
zcat mysql -uroot -p
Enter password: 아무거나 입력
ERROR 2002 (HY000): Can't connect to local MySQL server through socket '/var/run/mysqld/mysqld.sock' (2)

root@zserver:/home/zadmin# systemctl status mysqld
Unit mysqld.service could not be found.

apt install mysql-server -y
ERROR 2002 참고 이미지 2-2. Zabbix 서버 호스트에서 초기 스키마와 데이터를 가져오기 (패스워드 입력 후 조금 기다려야 함)
zcat /usr/share/zabbix/sql-scripts/mysql/server.sql.gz | mysql --default-character-set=utf8mb4 -uzabbix -p zabbix
Enter password: 패스워드 입력
2-3. log_bin_trust_function_creators 옵션을 비활성화
mysql -uroot -p
Enter password: 아무거나 입력

mysql> set global log_bin_trust_function_creators = 0;
mysql> quit;
3. Zabbix 서버에 대한 데이터베이스 구성
nano /etc/zabbix/zabbix_server.conf

DBPassword=패스워드 입력
DBPassword 참고 이미지 4. Zabbix 서버 및 에이전트 프로세스 시작
systemctl restart zabbix-server zabbix-agent apache2
systemctl enable zabbix-server zabbix-agent apache2
5. http://[서버 IP]/zabbix 접속 후 언어 선택 ( 서버에 한글 언어팩이 있으면 한글 적용 가능 )

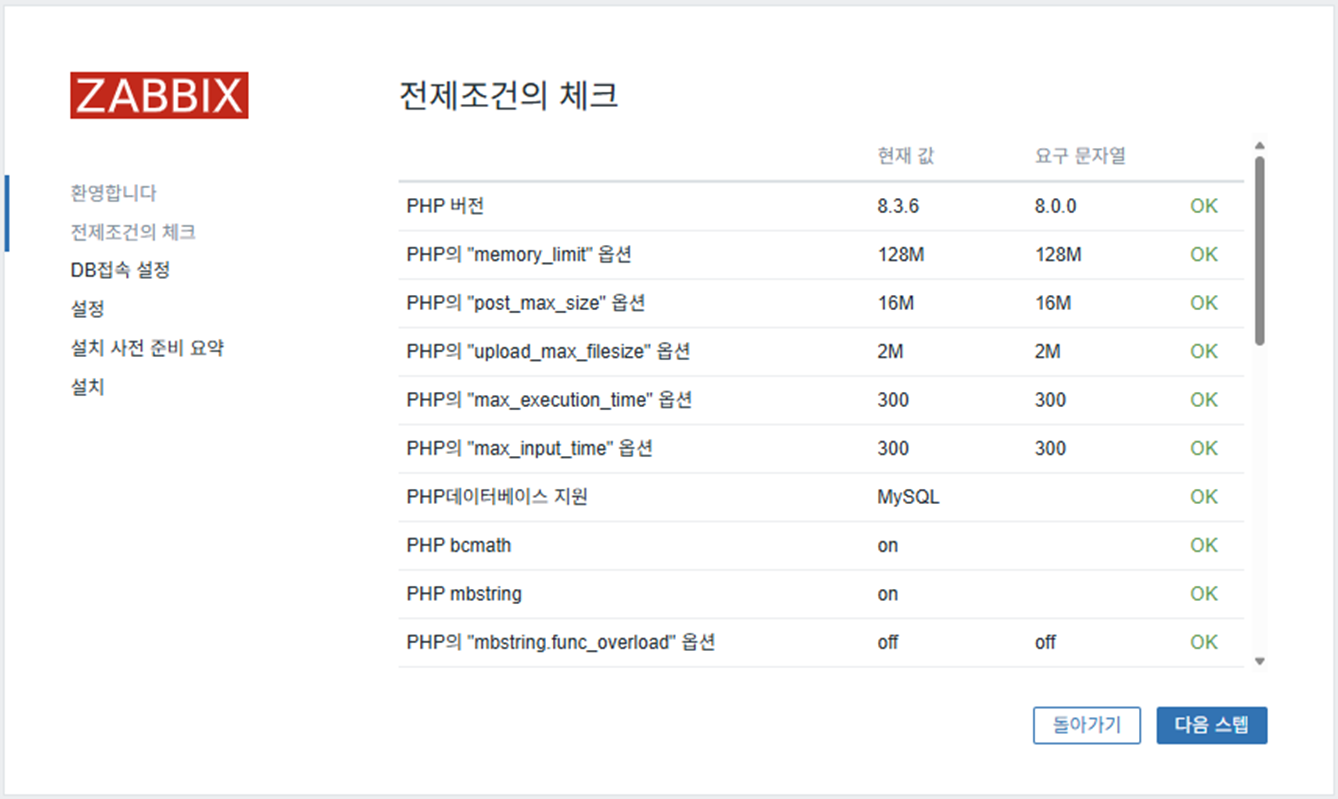
6. 전체 조건 체크
7. DB접속 설정 ( 암호는 설정한 DBPassword이다. )

8. 서버 이름, 시간대, 테마 설정

9. 설정 정보 요약

10. 설치 완료

설치 결과
1. http://[서버 IP]/zabbix 접속 후 로그인 ( ID : Admin / PW : zabbix )

2. 로그인 후 대시보드까지 접속이 된다면 정상적으로 설치된 것이다.

'Infra > NMS - Zabbix + Grafana' 카테고리의 다른 글
Zabbix 그래프 한글 깨짐 증상 (0) 2025.04.14 Zabbix Template, SNMP 호스트 등록 (0) 2025.04.13 Grafana 설치 및 Zabbix 연동 (4) 2025.04.13 Zabbix와 Grafana (0) 2025.04.13